Hi there.
Finally I was able to install whatsapp on my laptop. This I had to do because my smartphone broke down and I couldn't help stop using whatsapp. So had to find a way out.
Here I am sharing with you the method to do the same.
I have done this on UBUNTU 12.04 LTS.
To run Whatsapp you need android. So let us first install android emulator. The following steps should be followed as is. Open up the terminal. Then type in the terminal the following
sudo apt-get install openjdk-6-jre openjdk-6-jdk icedtea6-plugin
Then type the following.
wget http://dl.google.com/android/android-sdk_r20-linux.tgz
Wait for the download to complete. Then type the following.
tar -xvzf android-sdk_r20-linux.tgz
Then type the following
sudo apt-get install ia32-libs
Once he download is finished type the following.
cd ~/android-sdk-linux/tools
Followed by
./android
The Android Virtual Device configuration set up will open up.
If the AVD manager doesn't open up then try the following command.
./android avd
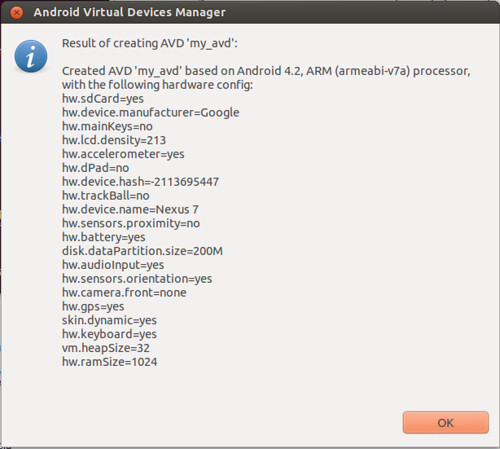
If an AVD has been successfully created, you will see the following confirmation.

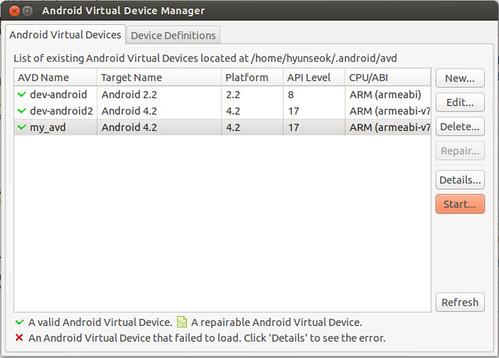
You can check the list of available AVDs as follows.
To launch Android emulator with the AVD that you have created, highlight the AVD on AVD Manager, and click on “Start” button on the right sidebar.

Alternatively, you can start Android emulator directly from command line as follows. In this case, specify “@[your_avd_name]” as an argument to the emulator.
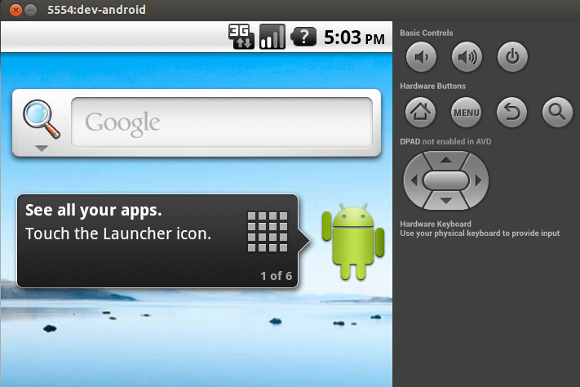
Booting up Android emulator may be slow (even taking minutes) depending on your hardware. Once Android emulator is successfully launched, you will see an running instance of Android device.
 - See more at: http://linuxicle.blogspot.com/2013/06/how-to-run-android-emulator-on-ubuntu.html#sthash.tGRleQ1e.dpuf
In the "tools" under "Manage AVDs" set up a new AVD. Then start up the avd and wait for the emulator to open up. Once done you will have your android up and running. Thereafter visit the play store through your emulated android and download and install whatsapp as you will do on your smartphone. And enjoy!!!
- See more at: http://linuxicle.blogspot.com/2013/06/how-to-run-android-emulator-on-ubuntu.html#sthash.tGRleQ1e.dpuf
In the "tools" under "Manage AVDs" set up a new AVD. Then start up the avd and wait for the emulator to open up. Once done you will have your android up and running. Thereafter visit the play store through your emulated android and download and install whatsapp as you will do on your smartphone. And enjoy!!!
If an AVD has been successfully created, you will see the following confirmation.
You can check the list of available AVDs as follows.
To launch Android emulator with the AVD that you have created, highlight the AVD on AVD Manager, and click on “Start” button on the right sidebar.
Alternatively, you can start Android emulator directly from command line as follows. In this case, specify “@[your_avd_name]” as an argument to the emulator.
Booting up Android emulator may be slow (even taking minutes) depending on your hardware. Once Android emulator is successfully launched, you will see an running instance of Android device.
- See more at: http://linuxicle.blogspot.com/2013/06/how-to-run-android-emulator-on-ubuntu.html#sthash.tGRleQ1e.dpuf
Finally I was able to install whatsapp on my laptop. This I had to do because my smartphone broke down and I couldn't help stop using whatsapp. So had to find a way out.
Here I am sharing with you the method to do the same.
I have done this on UBUNTU 12.04 LTS.
To run Whatsapp you need android. So let us first install android emulator. The following steps should be followed as is. Open up the terminal. Then type in the terminal the following
sudo apt-get install openjdk-6-jre openjdk-6-jdk icedtea6-plugin
Then type the following.
wget http://dl.google.com/android/android-sdk_r20-linux.tgz
Wait for the download to complete. Then type the following.
tar -xvzf android-sdk_r20-linux.tgz
Then type the following
sudo apt-get install ia32-libs
Once he download is finished type the following.
cd ~/android-sdk-linux/tools
Followed by
./android
The Android Virtual Device configuration set up will open up.
If the AVD manager doesn't open up then try the following command.
./android avd
Go to “Tools” > “Manage AVDs” on Android SDK Manager’s menu. It will open up AVD Manager.
Click on “Add” button to create a new AVD. An example configuration of a new AVD is shown below.

Click on “Add” button to create a new AVD. An example configuration of a new AVD is shown below.

If an AVD has been successfully created, you will see the following confirmation.
You can check the list of available AVDs as follows.
~/android-sdk/android list avds
 Available Android Virtual Devices:
   Name: my_avd
   Path: /home/xmodulo/.android/avd/my_avd.avd
  Target: Android 4.2 (API level 17)
    ABI: armeabi-v7a
   Skin: 800x1280
  Sdcard: 1G
To launch Android emulator with the AVD that you have created, highlight the AVD on AVD Manager, and click on “Start” button on the right sidebar.
Alternatively, you can start Android emulator directly from command line as follows. In this case, specify “@[your_avd_name]” as an argument to the emulator.
emulator @my_avd
Booting up Android emulator may be slow (even taking minutes) depending on your hardware. Once Android emulator is successfully launched, you will see an running instance of Android device.
Go
to “Tools” > “Manage AVDs” on Android SDK Manager’s menu. It will
open up AVD Manager.
Click on “Add” button to create a new AVD. An example configuration of a
new AVD is shown below. - See more at:
http://linuxicle.blogspot.com/2013/06/how-to-run-android-emulator-on-ubuntu.html#sthash.tGRleQ1e.dpuf
Go to “Tools” > “Manage AVDs” on Android SDK Manager’s menu. It will open up AVD Manager.
Click on “Add” button to create a new AVD. An example configuration of a new AVD is shown below.
Click on “Add” button to create a new AVD. An example configuration of a new AVD is shown below.
If an AVD has been successfully created, you will see the following confirmation.
You can check the list of available AVDs as follows.
~/android-sdk/android list avds
 Available Android Virtual Devices:
   Name: my_avd
   Path: /home/xmodulo/.android/avd/my_avd.avd
  Target: Android 4.2 (API level 17)
    ABI: armeabi-v7a
   Skin: 800x1280
  Sdcard: 1G
To launch Android emulator with the AVD that you have created, highlight the AVD on AVD Manager, and click on “Start” button on the right sidebar.
Alternatively, you can start Android emulator directly from command line as follows. In this case, specify “@[your_avd_name]” as an argument to the emulator.
emulator @my_avd
Booting up Android emulator may be slow (even taking minutes) depending on your hardware. Once Android emulator is successfully launched, you will see an running instance of Android device.
sudo apt-get install openjdk-7-jdk
sudo apt-get install openjdk-7-jdk
sudo apt-get install openjdk-7-jdk
sudo apt-get install openjdk-7-jdk